

18 Gold Nail Designs That Look Pure Luxury
Gold nails are the one manicure that works as hard at a wedding as it does at a holiday party. This guide rounds up 18 gold nail designs, organized by how much gold you actually want on your nails, from full liquid-chrome coverage to a single gilded accent. Every design includes its own photo, notes on which finish it uses, and honest advice on difficulty and wear.
If you came here for inspiration, skim the gallery. If you came to decide between chrome powder, foil, and glitter before you buy or book, the finishes comparison table near the end breaks down what each one really looks like, costs in effort, and how long it lasts.
Gold Nails in 2026: What Has Changed
Gold never leaves, but the way it is worn has shifted, and the designs in this guide reflect the current version. Full mirror chrome (design 1) is increasingly worn as an accent or a tip rather than a ten-nail set, part of the broader quiet-luxury move toward champagne and satin shades (designs 4 and 6) over bright yellow metal. Texture is the other big change: molten, raised, almost sculptural gold (design 9) has replaced flat glitter as the party finish people ask for by name. Micro-accents are up at the same time: a single line, a cuff, a scattering of flakes (designs 11, 12, and 14) is now a deliberate style choice rather than a timid one, helped by short natural nails staying in fashion. And rose gold has fully joined the family, treated as a shade of gold rather than a separate trend, which is why the shade-matching section later in this guide covers it alongside yellow and champagne.
Full-Coverage Gold
Full-coverage gold means every nail is gold, wall to wall. This is the boldest way to wear the color, and it photographs beautifully, which is why it dominates bridal and party manicures. The five finishes below look very different in person, so pick the one that matches your style and your patience.
1. Liquid Gold Chrome
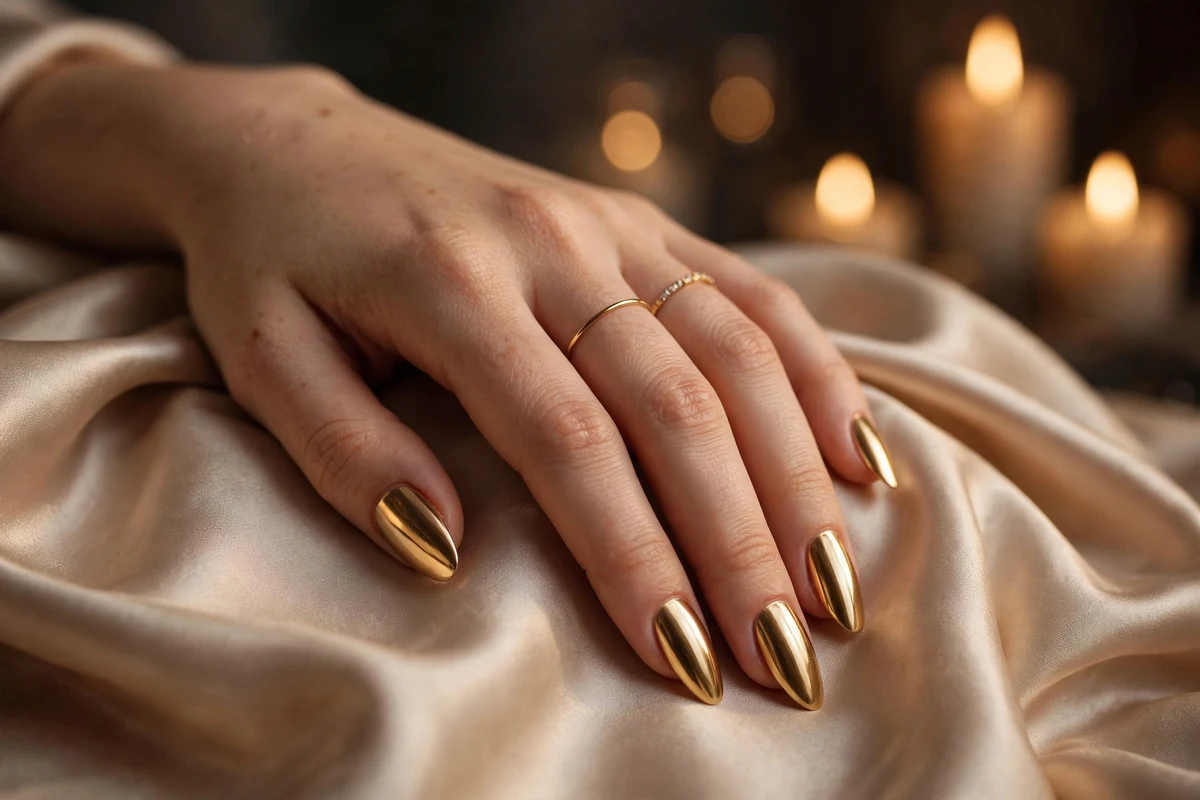
The look: a true mirror finish in warm gold, achieved by rubbing chrome powder over a gel base. It reads like polished metal, not polish.
Why it works: nothing catches light the way chrome does. Under evening lighting it looks almost liquid, which is why it is the most-requested gold finish in salons for weddings and New Year’s Eve. Almond or oval shapes flatter it most, since long curved nails give the mirror surface room to show off.
How to wear it: this is a salon job for most people. Chrome powder needs a tacky gel layer and a no-wipe top coat, and the prep determines whether it lasts two weeks or chips in three days. DIY difficulty: hard. Expect 2–3 weeks of wear with gel.
2. Fine Gold Glitter, Full Coverage

The look: dense, fine-particle gold glitter over the whole nail. Less reflective than chrome, more sparkle than foil.
Why it works: glitter hides a multitude of sins. Slightly uneven application disappears under the sparkle, and it suits shorter nails and active hands better than mirror chrome, which shows every ridge. It is also the easiest full-gold look to do at home: two coats of a quality glitter polish and a thick top coat.
How to wear it: short square or rounded nails keep it practical. DIY difficulty: easy. Removal is the price you pay: soak-off with foil wraps saves your nail surface.
3. Hammered Gold Foil
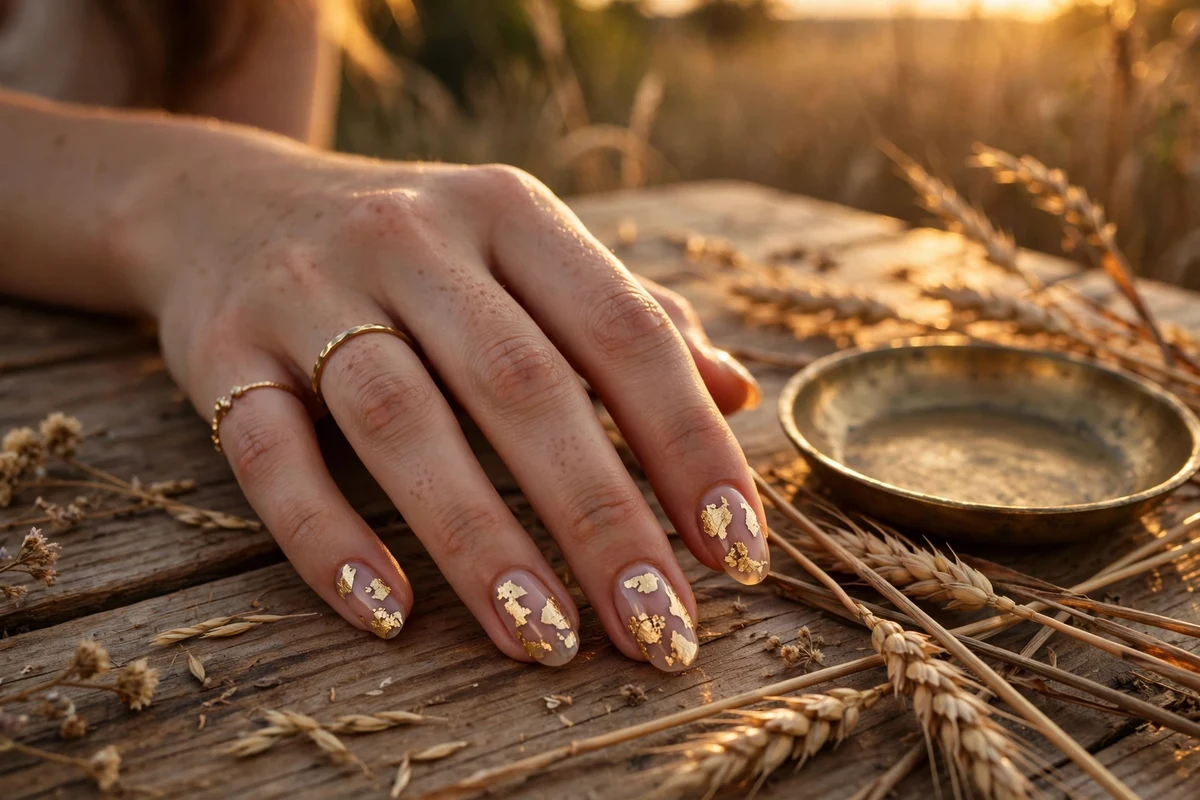
The look: torn sheets of gold leaf pressed onto a nude or milky base, sealed under gel. The result is irregular, textured, almost like hammered metal jewelry.
Why it works: foil gives you dimension that polish cannot. Because every nail tears differently, no two sets look identical, which is exactly the appeal for anyone who finds uniform chrome a little cold. It pairs beautifully with milky nail bases, which let the gold sit like jewelry on skin.
How to wear it: medium difficulty at home: press foil onto a tacky layer, seal the edges carefully or it lifts. Wear is 2+ weeks under gel; regular polish versions last about a week.
4. Brushed Satin Gold
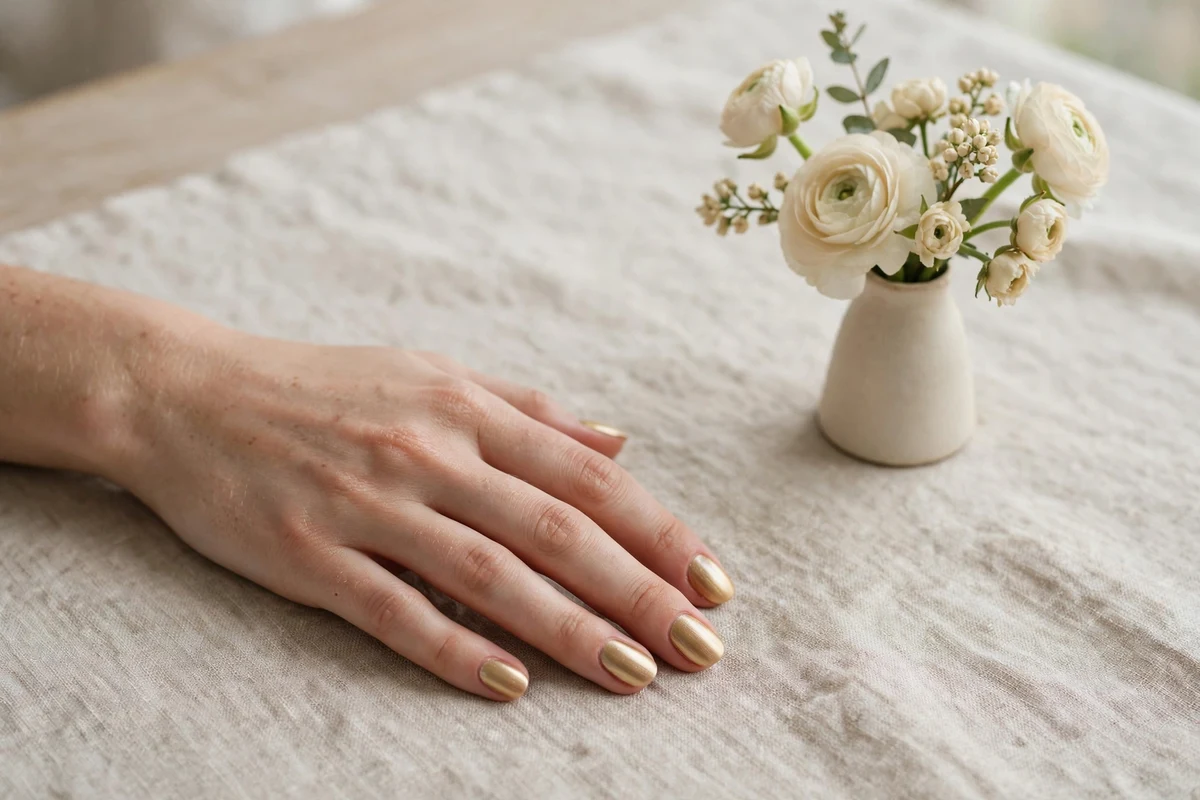
The look: a metallic gold polish with a soft, brushed sheen instead of a mirror shine. Think satin ribbon, not chrome bumper.
Why it works: this is the office-safe full gold. It reads as a rich neutral from a few feet away and only reveals its metallic character up close, so it passes in conservative workplaces where chrome would not. It also flatters mature hands, since the softer reflection does not emphasize texture the way a mirror finish can.
How to wear it: the easiest salon-quality gold: metallic polish, two coats, glossy top coat. DIY difficulty: easy. Lasts a standard polish week, or 2–3 weeks as gel.
5. Antique Patina Gold

The look: a deeper, aged gold with bronze depth and slightly darkened edges, like vintage jewelry.
Why it works: bright gold can feel loud in autumn and winter; antique gold keeps the warmth but drops the volume. It pairs naturally with dark wardrobes and is the gold that suits deep skin tones most richly. For a seasonal match, it sits beautifully beside the warm palette in our Thanksgiving nail designs.
How to wear it: usually a metallic gel polish, sometimes layered over a brown base to deepen it. DIY difficulty: easy to medium. Coffin and stiletto shapes carry the drama best.
Gold French & Tips
Gold tips give you the structure of a French manicure with the warmth of metal. These five designs keep the base sheer and let the gold do the talking at the free edge, which makes them the most versatile gold looks for both everyday wear and formal events.
6. Classic Gold French
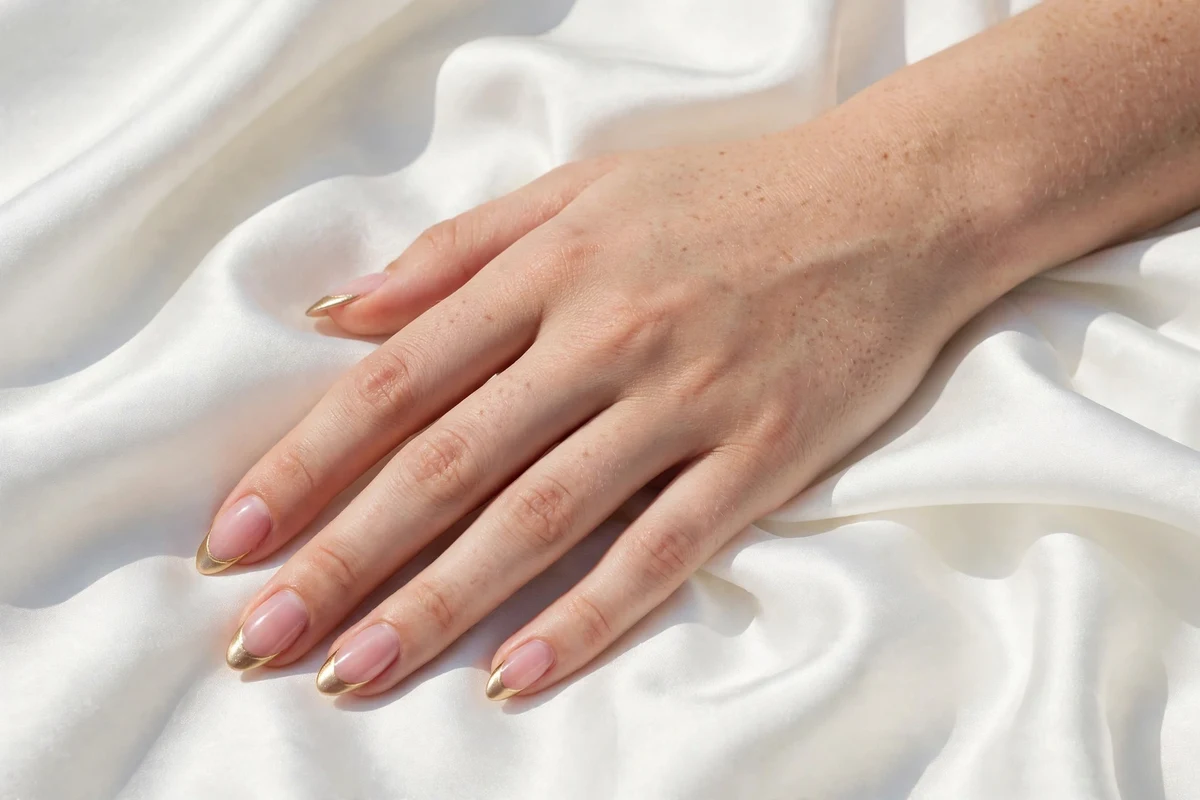
The look: the traditional French silhouette with the white tip swapped for metallic gold over a sheer pink or nude base.
Why it works: it is the single most wearable gold design. The sheer base keeps it neutral enough for the office, while the gold tip adds the polish that makes it feel intentional. It suits every nail shape and every skin tone, which is why it never really leaves the trend cycle.
How to wear it: ask for a metallic gold gel for the tip rather than glitter: cleaner lines, smoother wear. DIY difficulty: medium; a silicone cleanup brush is the secret to crisp smile lines.
7. Gold V-Tips
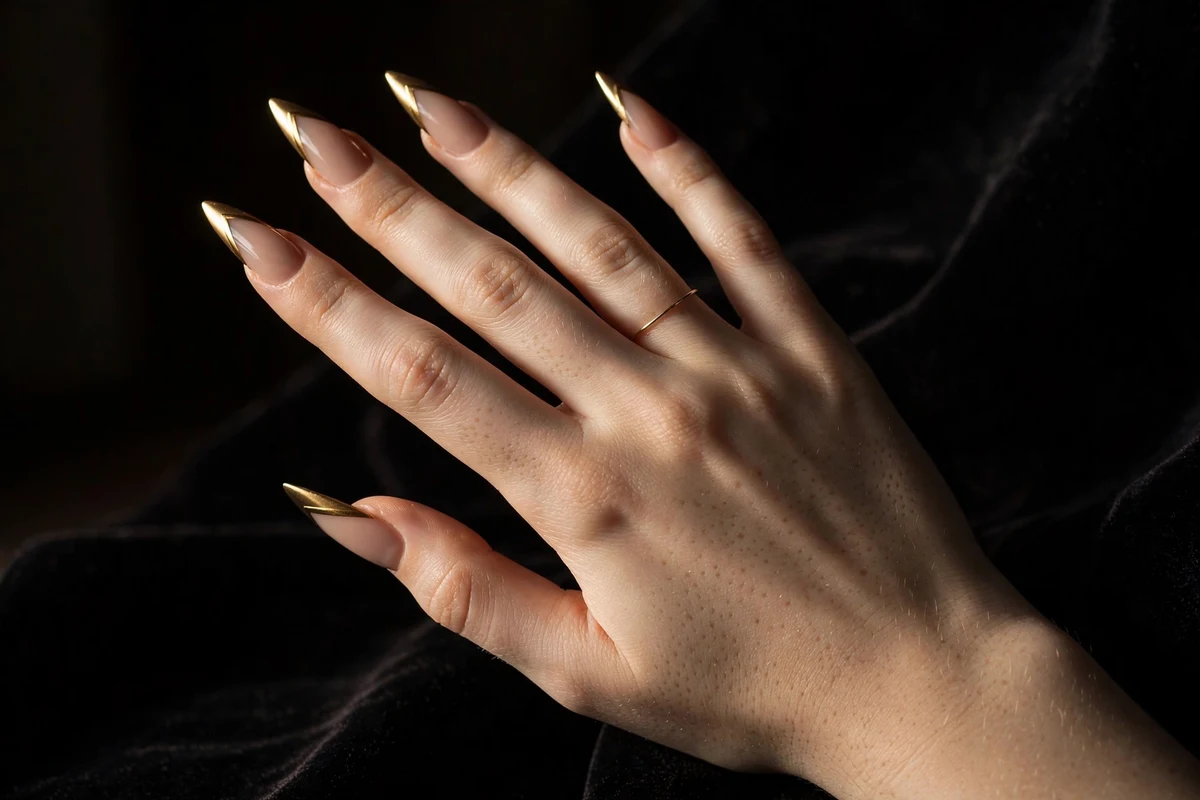
The look: the French tip redrawn as a sharp chevron, with the gold forming a V that points toward the cuticle.
Why it works: the angled line elongates the finger visually, which makes it a strong choice on shorter nails that want drama without length. On stiletto and coffin shapes it looks architectural and modern. Compared with the classic French, it reads younger and edgier.
How to wear it: best done with foil or chrome for a razor-sharp edge; polish can look soft at the point. DIY difficulty: medium to hard. If your nails are very short, keep the V shallow so it does not crowd the nail.
8. Gold Glitter Ombré Fade
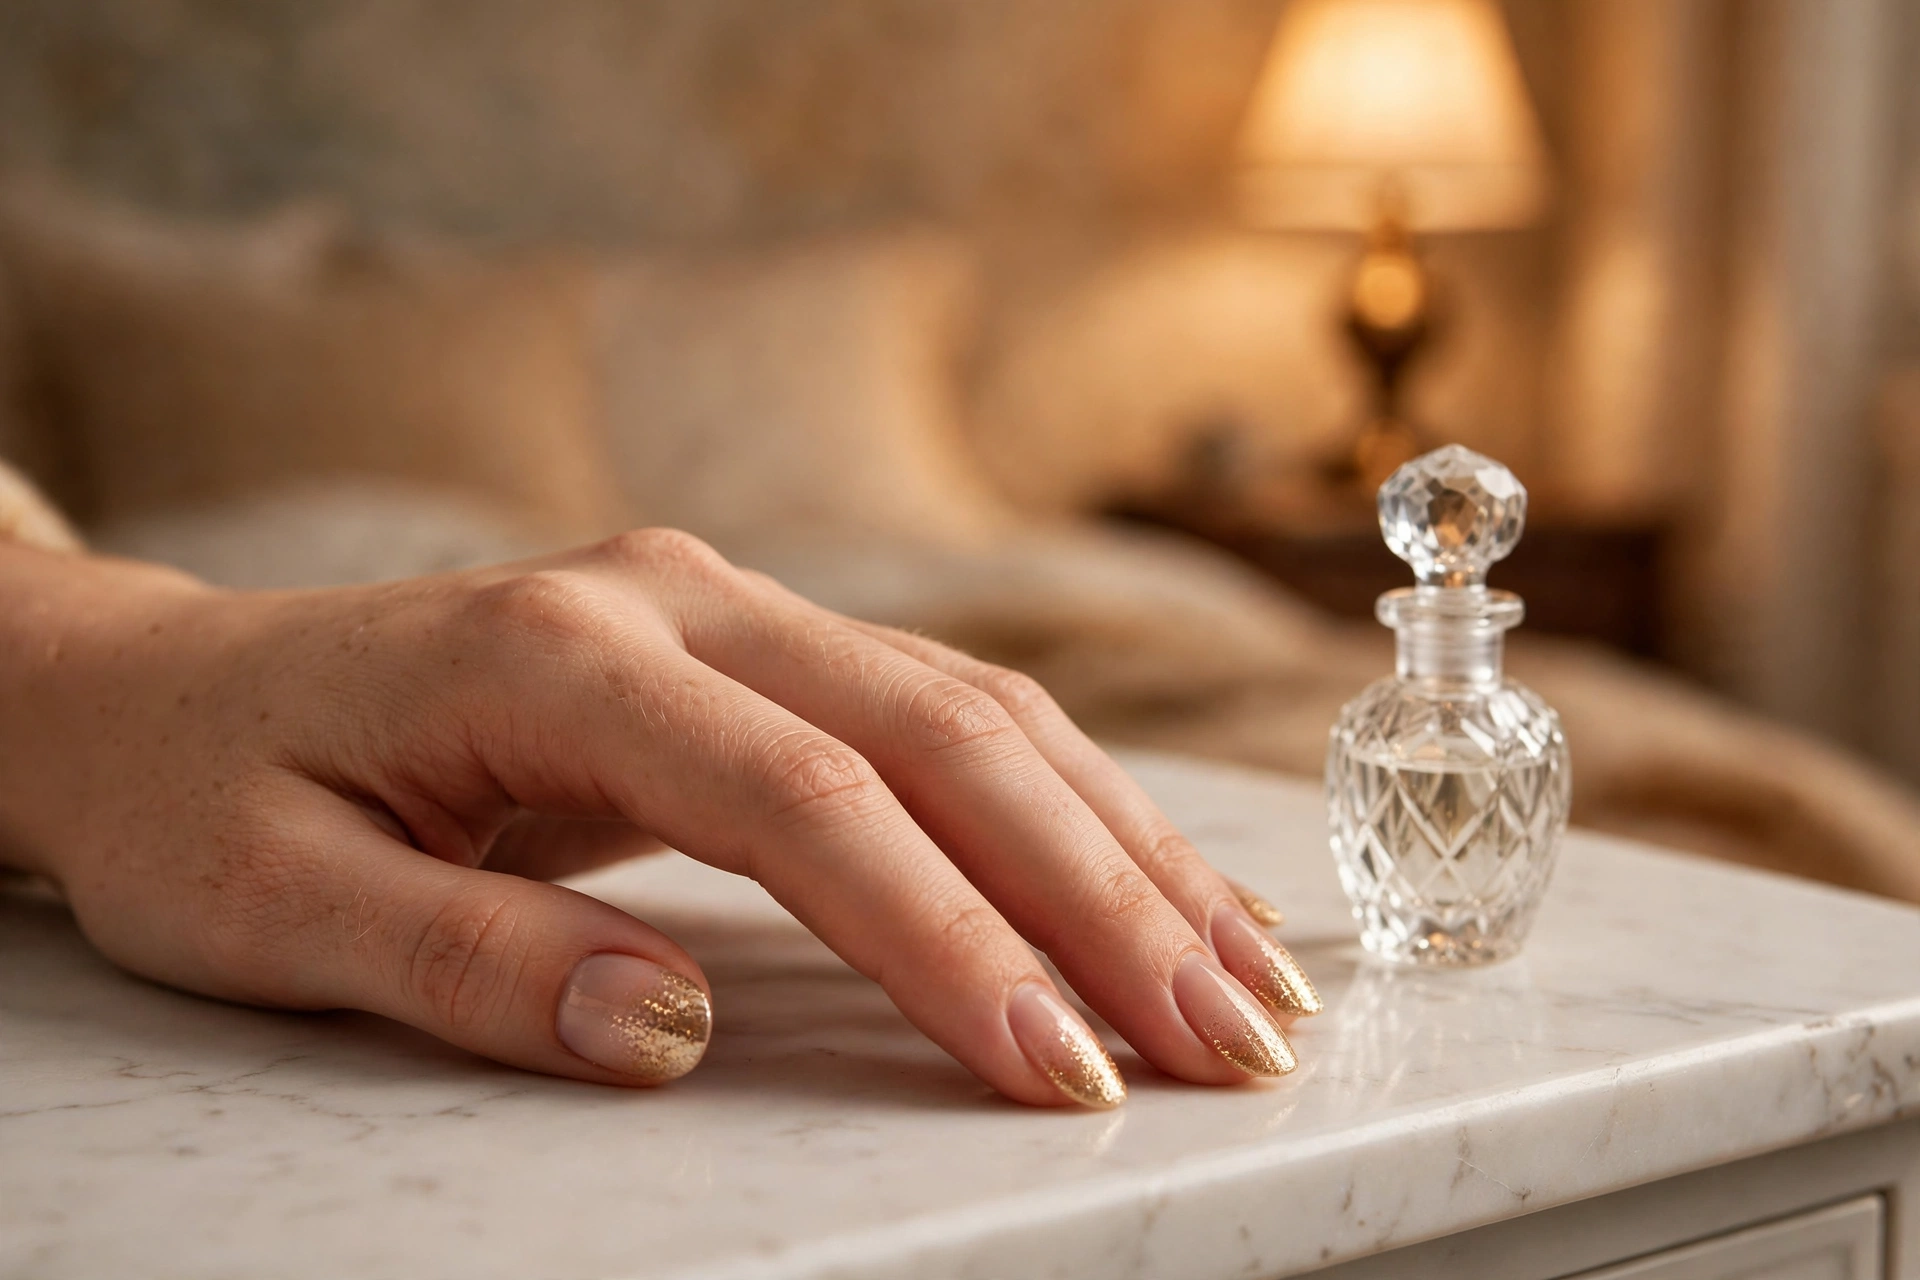
The look: a sheer nude base that melts into gold glitter at the free edge, with no hard line between the two.
Why it works: the gradient removes the precision problem entirely: there is no smile line to get wrong, so it is the most forgiving gold tip design. It grows out gracefully, since the base near the cuticle is already sheer. Brides love it because it photographs as classic nude from a distance and reveals the sparkle up close.
How to wear it: sponge the glitter on in layers, densest at the tip. DIY difficulty: easy to medium. Seal with two layers of top coat or the glitter edge feels rough.
9. Molten Drip Tips
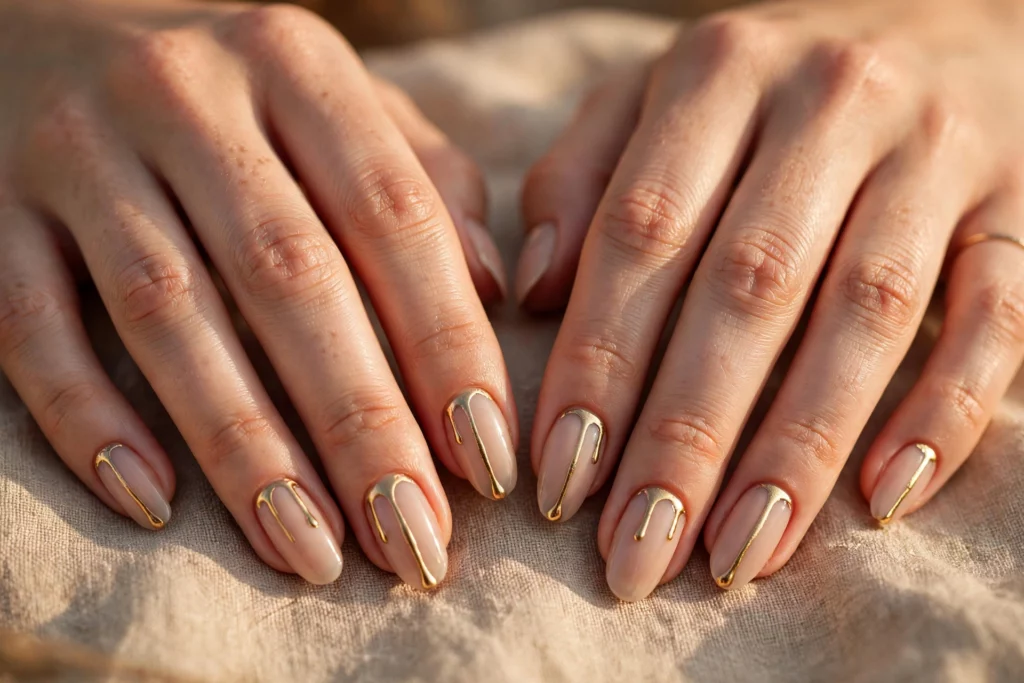
The look: gold tips that appear to melt, with thin drips of metallic gold running partway down the nail.
Why it works: it takes the most traditional gold design and makes it the most artistic. The irregular drips mean perfection is not the goal, which paradoxically makes it easier to wear than a crisp French: small flaws read as part of the design. It suits medium to long nails, where the drips have room to travel.
How to wear it: a fine nail-art brush and metallic gel, cured between drips so they hold their shape. DIY difficulty: medium. Keep drips short on work hands; long drips snag.
10. Reverse French in Gold

The look: the French idea flipped: instead of a gold tip, a thin gold curve hugs the cuticle line.
Why it works: it puts the gold where jewelry sits, so the manicure reads as an accessory rather than a statement. It is subtle enough for strict dress codes and it draws the eye along the whole nail, which flatters short nail beds. As a bonus, it grows out invisibly.
How to wear it: chrome powder or a metallic striping polish gives the cleanest curve. DIY difficulty: medium; steady hands matter more than tools here.
Gold Accents
Gold accents are for anyone who loves the color but wants their manicure to stay quiet. A sheer or nude base with one gilded detail reads refined rather than flashy, and these four designs are the easiest entry point into gold nails, especially if you are trying the color for the first time.
11. Floating Gold Flakes
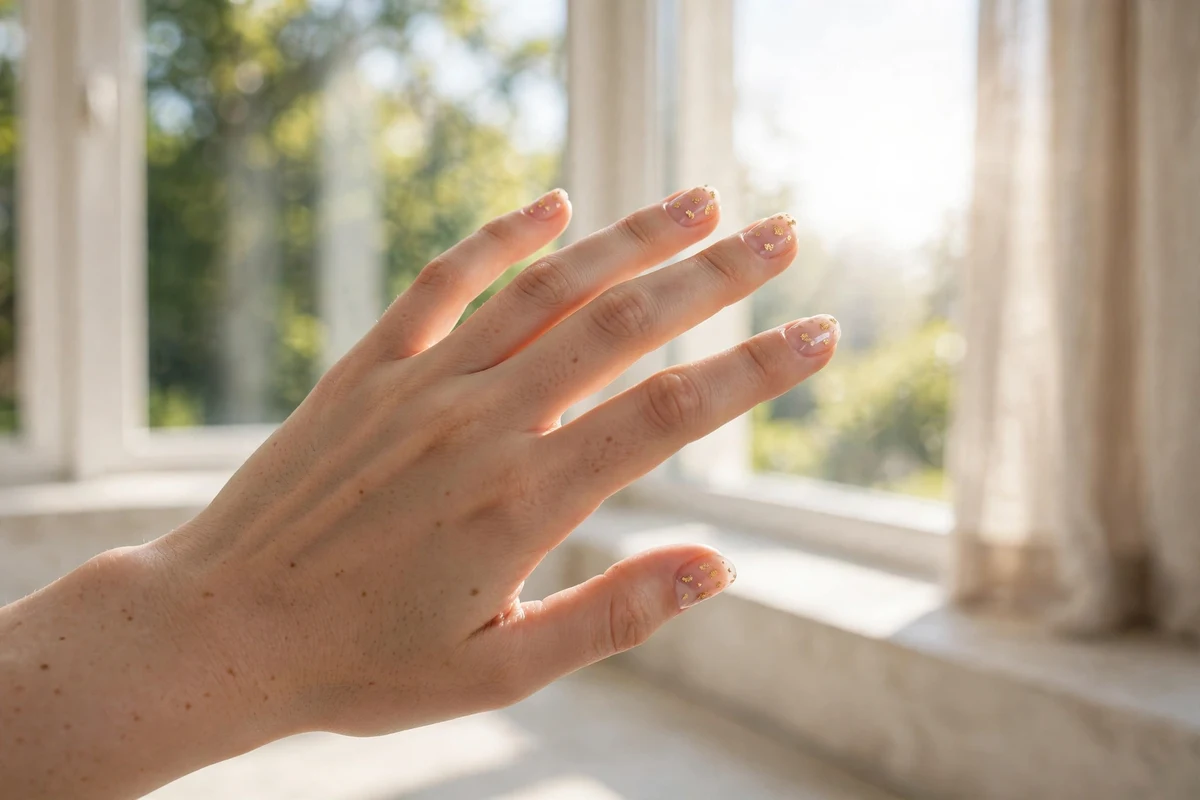
The look: tiny irregular gold flakes scattered across a sheer nude or clear base, like gold leaf suspended in glass.
Why it works: it is the least committal gold design and one of the prettiest. The flakes catch light as you move but the overall effect stays neutral, so it works for job interviews, classrooms, and anywhere a full metallic would feel like too much. It also suits every nail length, including very short natural nails.
How to wear it: the classic beginner foil design: place flakes on a tacky layer with tweezers, seal thoroughly. DIY difficulty: easy. Keep flake edges tucked under top coat or they catch on fabric.
12. Half-Moon Cuticle Cuff
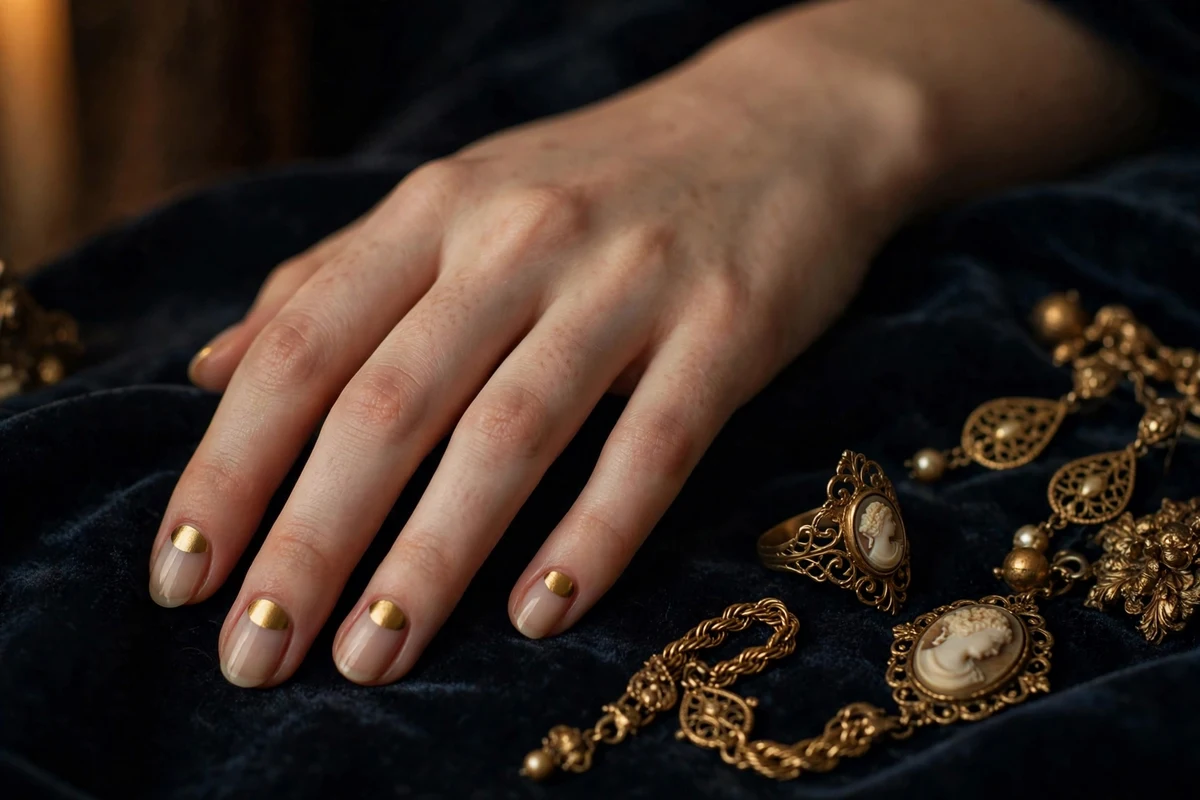
The look: a solid gold half-moon hugging the cuticle, with the rest of the nail left sheer.
Why it works: vintage in origin, modern in effect. The cuff frames the nail the way a ring frames a finger, and because the gold sits at the base, tips stay clean and the design survives typing and housework better than gold tips do. It is a genuine vintage technique that has cycled back into salon menus.
How to wear it: metallic gel applied with a small flat brush, or a half-moon stencil for DIY. DIY difficulty: medium. Oval and almond shapes show the curve best.
13. The Single Gilded Feature Nail
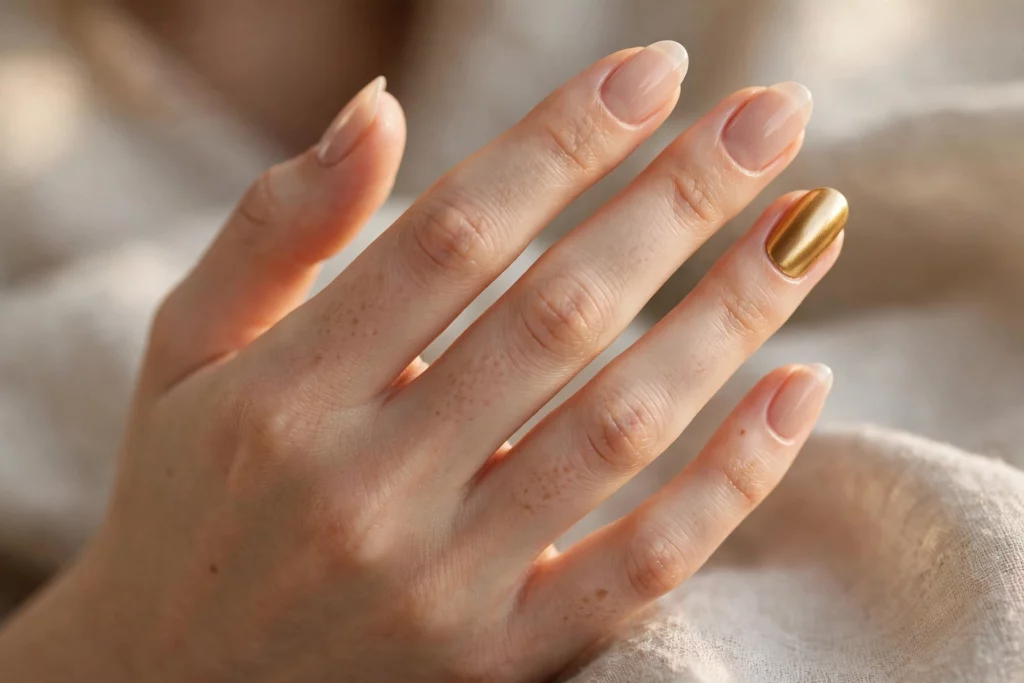
The look: four nails in sheer nude, one nail, usually the ring finger, in full gold.
Why it works: it gives you a full-gold nail to admire without committing the whole hand. The contrast actually makes the gold look richer than it does in a full set, and it is the safest way to test whether you like wearing metallics. For weddings, it echoes the ring itself, which is why it shows up in so many bridal sets.
How to wear it: use your boldest finish on the feature nail: chrome, glitter, or foil. DIY difficulty: easy. Keep the other four nails truly sheer so the gold stays the star.
14. Fine Gold Line Work
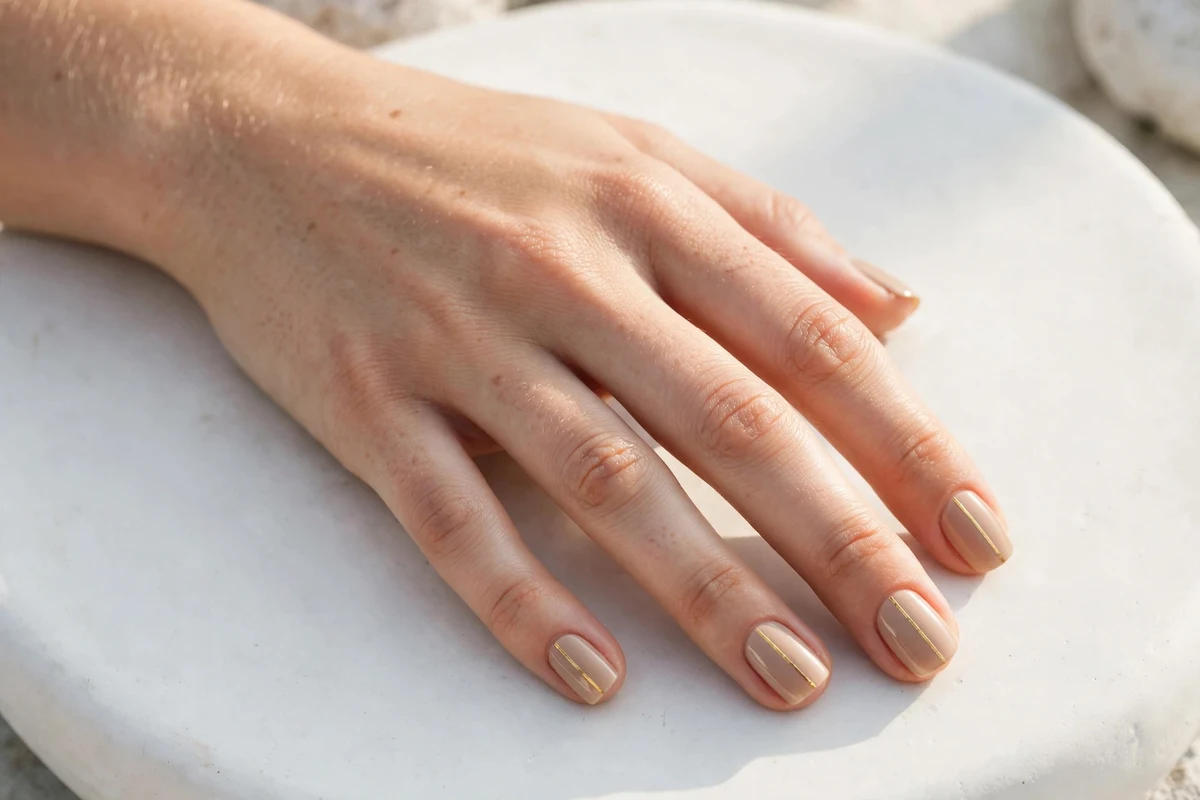
The look: hairline gold lines, geometric, diagonal, or bordering the nail edge, drawn over a nude base.
Why it works: minimal line work is the design that converts gold skeptics. From across the room the nails look nude; up close the gold detailing signals real intention. It suits short nails particularly well, since a single vertical line visually lengthens the nail.
How to wear it: a striping brush and metallic gel, or thin gold striping tape under top coat for DIY. DIY difficulty: medium. Less is more: one or two lines per nail is the sweet spot.
Gold Nail Art & Motifs
These four designs use gold as an art medium rather than a finish: hand-painted motifs and textures where gold is the ink. They take more time and usually a skilled hand, but they are the designs people photograph and ask about.
15. Celestial Gold Starbursts
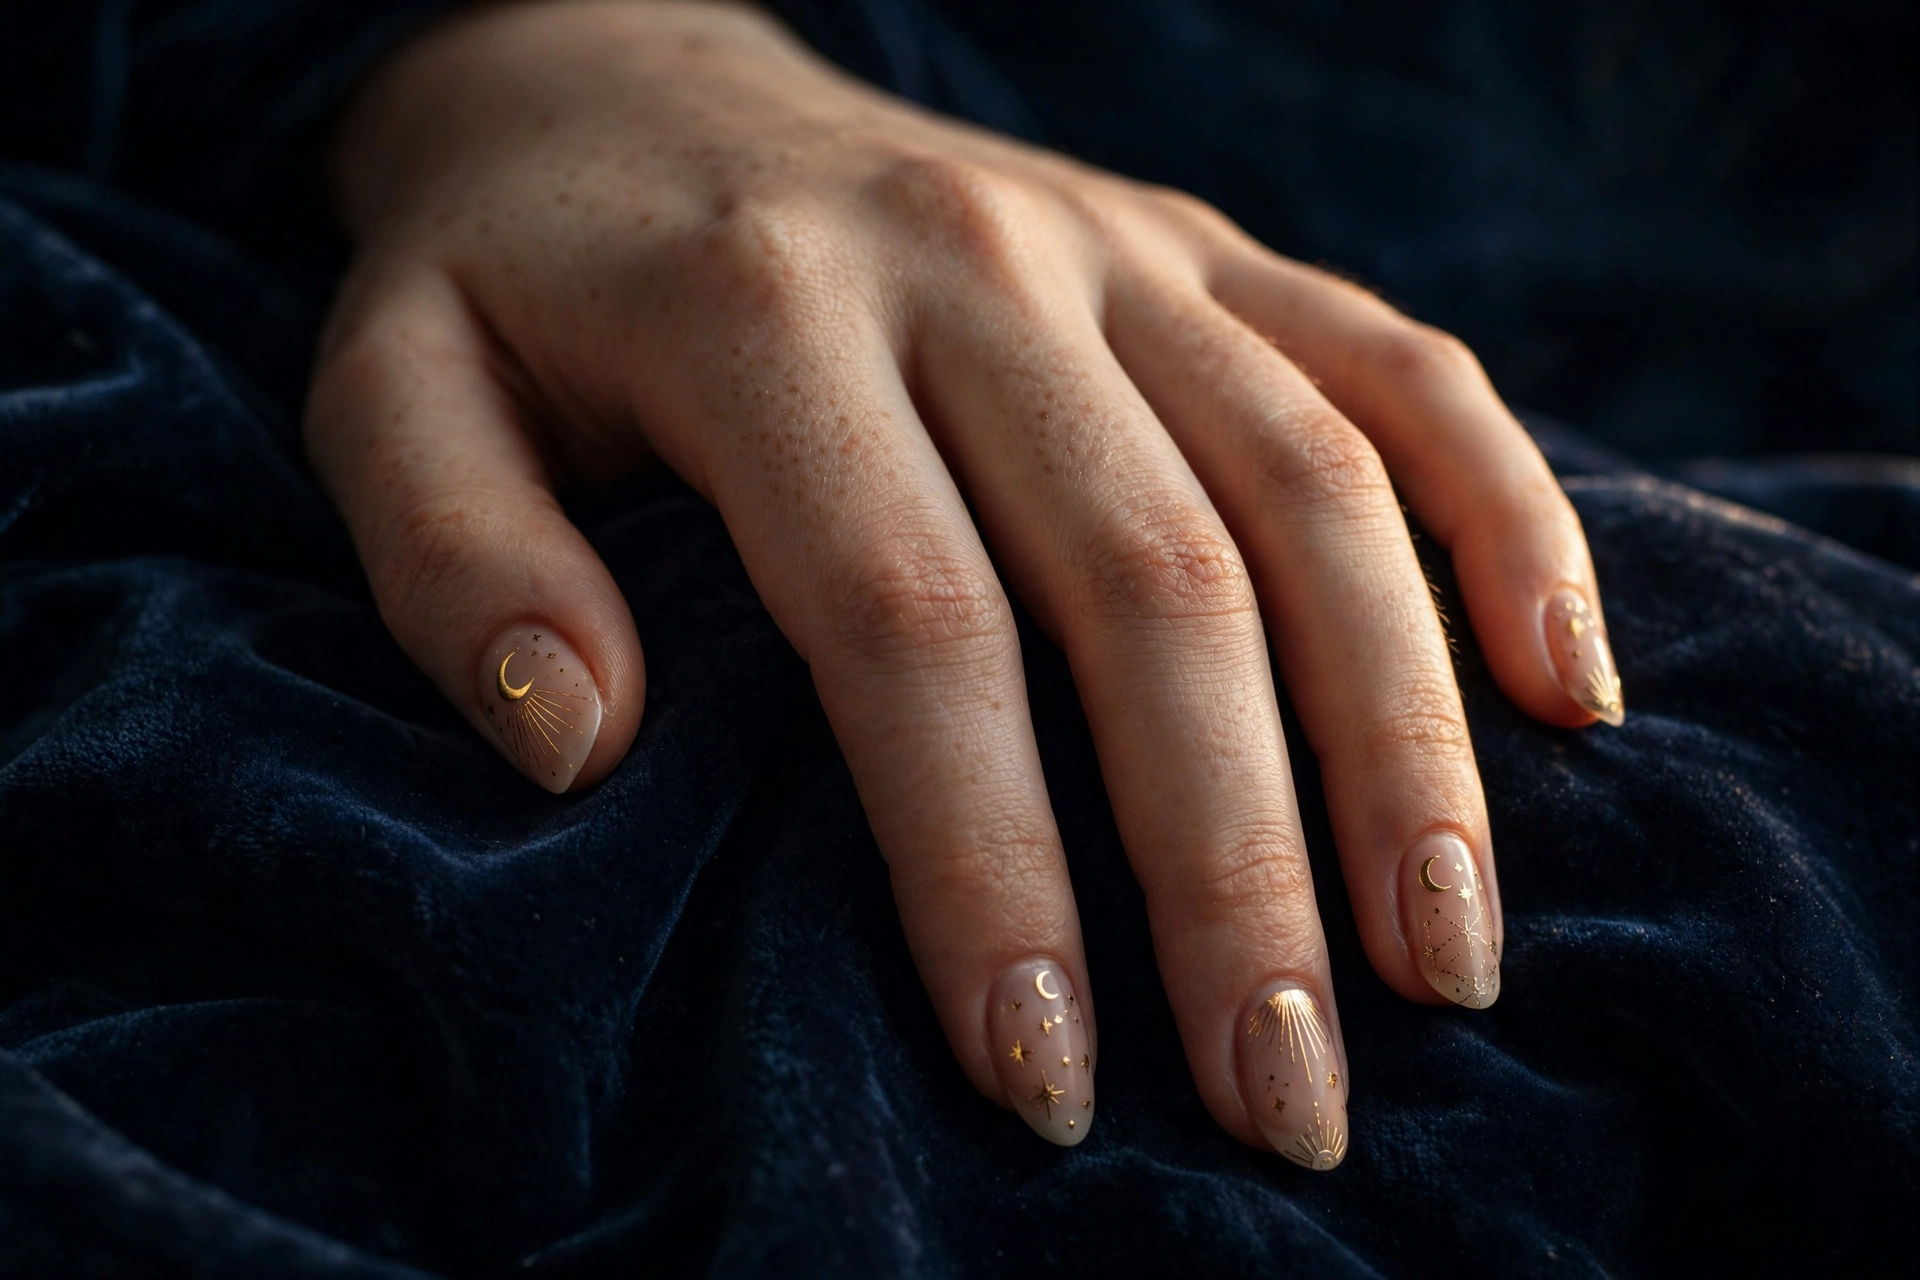
The look: fine gold stars, crescent moons, and radiating lines hand-painted over nude or deep navy.
Why it works: celestial motifs in gold have real staying power: they read festive in December, which is why they pair so well with Christmas nail designs, yet feel mystical rather than seasonal the rest of the year. The fine lines demand precision, so this is firmly salon territory unless you paint nails regularly.
How to wear it: metallic gold gel and a detail brush over your chosen base; deep bases make the gold pop hardest. DIY difficulty: hard. Ask your tech to vary the motif per nail so the set feels hand-painted, not stamped.
16. Kintsugi Crackle Lines
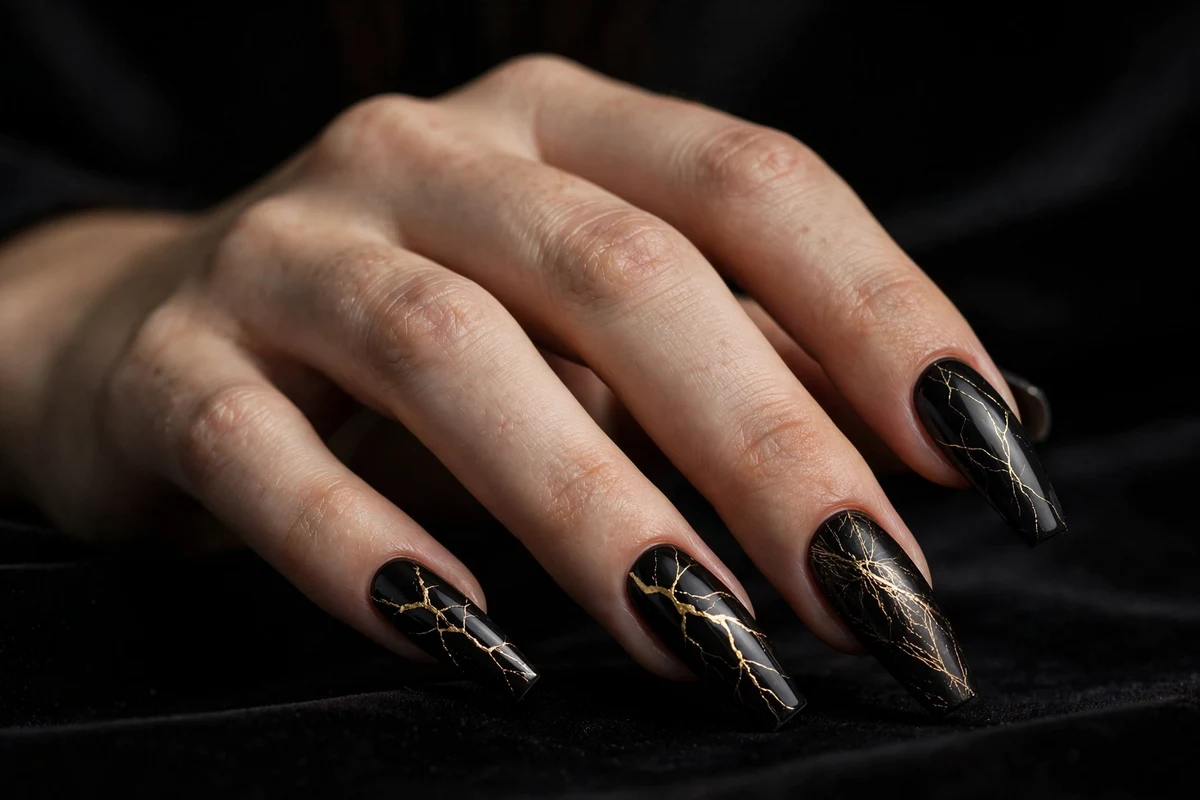
The look: thin, branching gold veins across a dark base, inspired by kintsugi, the Japanese art of mending pottery with gold.
Why it works: it is the most editorial gold design on this list. The contrast of dark polish and gold veins is striking in photos, and the organic branching means no two nails match, which keeps it from looking manufactured. It sits naturally alongside black nail designs if you want to explore the dark-base family further.
How to wear it: paint the dark base, then draw branching veins with metallic gold gel and a fine brush. DIY difficulty: hard. Seal with a glossy top coat; the shine is half the effect.
17. Gold-Veined Marble
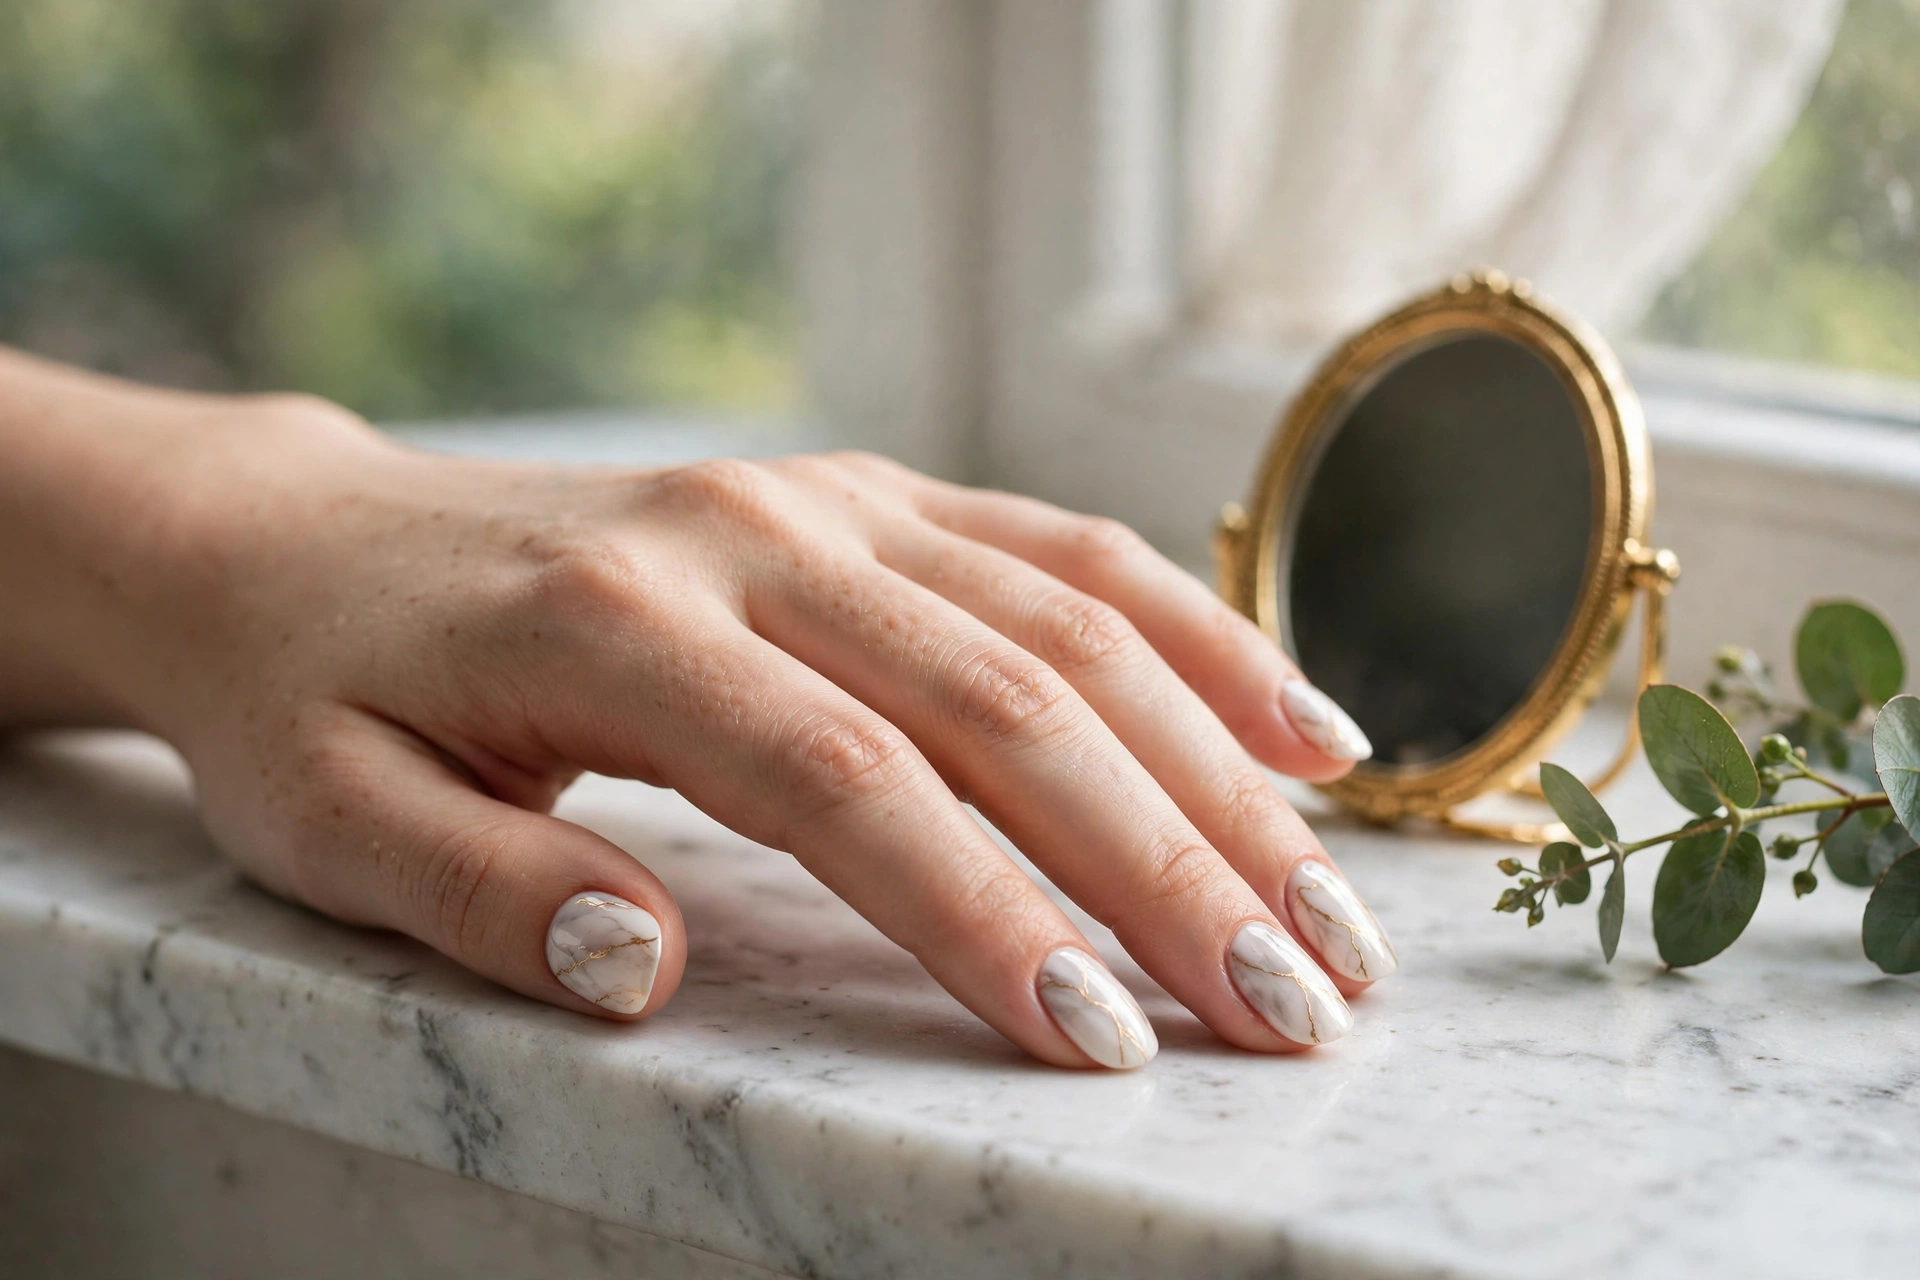
The look: soft white-and-grey marble with thin gold veins running through the stone pattern.
Why it works: marble is already an elegant neutral; the gold veins lift it from pretty to luxurious without adding any real visual weight. It is one of the few art designs that suits conservative settings, since from a distance it reads as a classic white nail design with extra depth.
How to wear it: bloom the marble with diluted polish or blooming gel, then vein with metallic gold once set. DIY difficulty: medium to hard. Almond and coffin shapes give the stone pattern the most canvas.
18. 3D Gilded Charms
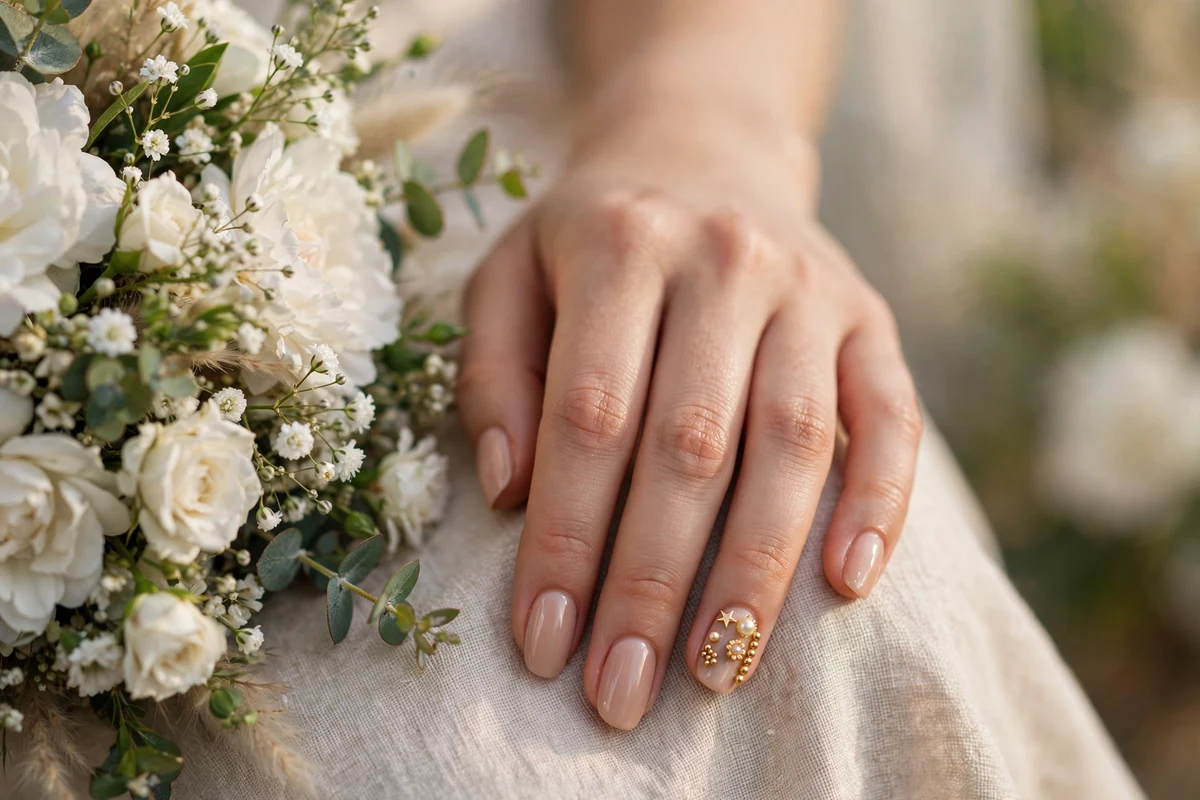
The look: small gold charms, beads, or a miniature ring set onto one or two accent nails over a nude base.
Why it works: charms turn the manicure into actual jewelry, which is why this design peaks at weddings. Kept to one nail, it stays elegant; spread across the hand, it becomes maximalist party nails. Either way, it is unmistakably gold in a way no flat finish can match.
How to wear it: charms must be set in builder gel or gem adhesive and encapsulated or they pop off within days. DIY difficulty: hard. Reserve this for events rather than everyday: charms snag on knitwear and hair.
Which Gold Design Should You Choose?
Eighteen designs is a lot of gold. The fastest way to narrow them down is to start with the occasion, not the finish: the right amount of gold for a wedding is wrong for a Tuesday, and the design that survives a keyboard job is not the one that photographs best at midnight. Use this table to shortlist two or three, then check the finishes table below for what each one demands.
| Your situation | Go for | Designs to look at |
|---|---|---|
| Wedding or formal event | Refined shine, nothing that fights the jewelry | Classic Gold French (6), Single Gilded Feature Nail (13), 3D Gilded Charms (18) |
| Office with a real dress code | Gold that reads as a neutral | Brushed Satin Gold (4), Reverse French (10), Fine Gold Line Work (14) |
| Party, holiday, New Year’s Eve | Maximum light-catch, short commitment | Liquid Gold Chrome (1), Fine Gold Glitter (2), Celestial Starbursts (15) |
| Everyday, low maintenance | Sheer bases that grow out invisibly | Floating Gold Flakes (11), Gold Glitter Ombré Fade (8), Half-Moon Cuff (12) |
| Short nails | Designs that add length visually or stay practical | Fine Gold Glitter (2), Gold V-Tips (7), Reverse French (10) |
| Long nails, maximum drama | Big surfaces and art that needs canvas | Molten Drip Tips (9), Kintsugi Crackle (16), Antique Patina (5) |
| First time wearing gold | One accent before a full set | Floating Gold Flakes (11), Single Gilded Feature Nail (13) |
Two honest rules of thumb: the more gold coverage, the more the finish shows wear, so full chrome is a commitment and flakes are not; and if you type or work with your hands all day, keep gold at the cuticle or in accents, where it survives contact, rather than at the tips, where it takes it.
Gold Finishes Compared
Choosing between chrome, foil, glitter, and metallic polish matters more than choosing the design, because the finish decides the look, the effort, and the lifespan. This table compares the five ways to get gold onto nails.
| Finish | The look | Best for | DIY difficulty | Typical wear |
|---|---|---|---|---|
| Chrome powder | Mirror-smooth liquid metal | Evening, weddings, parties | Hard (needs gel + no-wipe top coat) | 2–3 weeks as gel |
| Metallic polish | Soft brushed sheen | Office, everyday, mature hands | Easy | 1 week polish / 2–3 weeks gel |
| Gold foil / flakes | Irregular textured metal | Artistic sets, accent nails | Easy–medium | 2+ weeks sealed under gel |
| Glitter polish | Sparkle, dimension | Beginners, short nails, parties | Easy | 1–2 weeks (soak-off removal) |
| Magnetic cat-eye gold | Shifting light band in gold | Subtle drama, medium lengths | Medium (needs magnet wand) | 2–3 weeks as gel |
Match Your Gold to Your Skin Tone and Your Jewelry
“Gold” is four different colors wearing one name, and picking the right shade matters more than picking the design. Yellow gold is the classic: warm, saturated, and richest on warm and deep skin tones. Champagne gold is paler and softer, closer to a bright neutral, and it is the shade that behaves best on fair and cool undertones. Rose gold leans pink; it flatters cool and neutral skin, softens the whole idea of a metallic manicure, and is the easiest entry point if yellow gold feels loud. Antique and bronze golds (design 5) run deep and muted, and they come alive on deep skin tones and in autumn and winter light.
Then check your hands, not the bottle. If your everyday rings and watch are yellow gold, match them: same-metal nails and jewelry read as one deliberate look. If your jewelry is white gold, platinum, or silver, a full set of yellow gold nails will compete with it across the same ten fingers. The fixes are simple: choose champagne instead of yellow gold, narrow the gold to an accent (designs 10, 13, and 14), or lean into mixed metals on purpose with one silver-toned element so the mix looks chosen, not accidental. Brides: match the metal of the ring the photos will feature. The manicure sits in the same frame as the ring in every close-up, and matched metals are why some ring shots look expensive and others look slightly off.
If you are between shades, test the way salons do: hold a gold ring, a coin, or the polish bottle against the back of your hand in daylight. The right gold makes your skin look warmer and more even; the wrong one makes it look grey or sallow. Trust that ten-second test over any trend.
How to Make Gold Nails Last
Gold finishes show wear faster than cremes because any chip breaks the reflective surface. Three habits make the difference: cap the free edge with every layer including top coat, since tips take the first impact; wear gloves for cleaning, because household chemicals dull metallic finishes faster than regular polish; and reapply a thin top coat every two to three days on glitter and foil designs, which lose their seal first. For shape advice that affects how long any design survives daily life, see our nail shapes guide.
Salon or DIY: What to Ask For, and What to Buy
Gold finishes fail more often from miscommunication than from technique, so it helps to book in the salon’s own language. For chrome, ask for “chrome powder over gel with a no-wipe top coat” and name the shade (yellow, champagne, or rose) rather than just “gold chrome”; expect the appointment to run about as long as a standard gel set, with chrome adding a few minutes per hand. For foil, ask whether the salon uses transfer foil or real leaf: transfer foil is smoother and more even, leaf is more irregular and textured, and they are different looks at similar prices. For any design in this guide, bringing the photo of the specific design works better than describing the finish, because “gold nails” means five different things to five different technicians.
Doing it at home, buy per finish rather than building a general kit. Chrome needs gel polish, a lamp, chrome powder, and a no-wipe top coat; there is no regular-polish shortcut that produces a true mirror. Foil needs foil sheets or flakes and something tacky to grip them: a dedicated foil glue gives the fullest transfer, but a layer of polish left to dry until just tacky works for scattered flakes, which is exactly why designs 3 and 11 are the recommended first attempts. Glitter needs only a dense glitter polish and a thick, ridge-filling top coat. Line work needs a striping brush or striping tape. The one tool that upgrades every design on this list costs almost nothing: a small angled cleanup brush and acetone, used to sharpen edges before anything cures or dries.
Gold Nails FAQ
Do gold nails suit all skin tones?
Yes, with the right gold. Warm, yellow golds flatter warm and deep skin tones; paler champagne and soft satin golds suit fair and cool undertones best. If you are unsure, a sheer gold like floating flakes is universally flattering because your natural nail shows through.
What is the difference between gold chrome and gold foil?
Chrome is a fine powder rubbed over gel for a perfectly smooth mirror finish; foil is torn metal leaf pressed on for an irregular, textured look. Chrome looks sleek and modern, foil looks artistic and handmade. Chrome needs a salon gel setup, while foil is one of the easier techniques to try at home.
How long do gold chrome nails last?
Done properly over gel with a no-wipe top coat, gold chrome lasts 2–3 weeks like any gel manicure. The weak point is the free edge: chrome lifts first where nails meet daily friction, so capping the tip and wearing gloves for housework genuinely extends wear.
Can I do gold foil nails at home?
Yes. Foil is the most beginner-friendly gold technique: press torn pieces onto a tacky polish layer with tweezers and seal with two coats of top coat. The irregular look is forgiving, which is exactly why floating flakes and hammered foil are recommended as first gold designs.
Are gold nails appropriate for the office?
Some are. Brushed satin gold, fine line work, reverse French, and floating flakes all read as neutrals in professional settings. Full mirror chrome and 3D charms are better saved for evenings and events. When in doubt, choose the quieter finish, not a quieter color.
How do you remove gold glitter polish without damaging nails?
Soak cotton in acetone-based remover, press it onto each nail, wrap with foil, and wait 10–15 minutes before gently pushing the glitter off. Never peel or scrape glitter polish: it takes layers of the nail surface with it. Follow with cuticle oil to rehydrate.
Which nail shape shows off gold designs best?
Almond and oval give reflective finishes like chrome the curved surface they need to shine; coffin and stiletto suit dramatic art like kintsugi and drips; short square and round keep glitter and accents practical. The design matters more than the shape, but longer nails always show gold finishes to better effect.
Do I need a special glue for gold foil nails?
For full, even foil transfer, yes: a dedicated foil glue or foil gel gives the tackiest, most reliable grip and the cleanest result. For scattered flakes and torn-leaf designs like Floating Gold Flakes, you can skip it: press the foil onto a layer of polish or gel that has dried to just tacky, then seal well. The glue question is really about coverage: the more of the nail the foil has to cover, the more the glue matters.
Can I do gold chrome nails with regular polish?
Not a true mirror. Chrome powder needs the smooth, tacky surface of a gel layer and a no-wipe top coat to seal it; over regular polish it goes dull and patchy within a day. The regular-polish alternatives that come closest are metallic polishes like Brushed Satin Gold (design 4), which trade the mirror for a soft sheen, and chrome-effect polishes, which look good for an evening but wear faster than gel chrome.
How do I remove gold chrome and gold foil nails?
The same way you remove the gel underneath them, because that is what you are actually removing. File the top layer lightly to break the seal, soak cotton in acetone, press it on each nail, wrap in foil, and wait 10–15 minutes before pushing the softened product off gently. Foil and chrome come away with the gel. Never pry chrome off dry: it bonds to the top coat, and prying takes nail surface with it. Finish with cuticle oil, as acetone dries the nail plate.
What colors go best with gold nails?
Gold pairs most naturally with deep, warm bases: black, burgundy, chocolate brown, and emerald make it look richer, which is why Kintsugi Crackle Lines (design 16) works so well. On the soft side, milky white, nude, and blush keep gold delicate and bridal. The pairing to avoid is a bright, cool yellow or neon base, which fights the gold instead of framing it; and if your nails are the accent rather than the base, a neutral outfit palette lets them carry the metallic note alone.
Keep Exploring Gold
Gold rarely travels alone. See how it pairs with deep bases in our black nail designs, with warm neutrals in brown nail designs, or go full festive with Christmas nail designs, where gold does its heaviest seasonal lifting.

One Comment